Showing posts with label Pottery Barn. Show all posts

31 January 2011

Pottery Barn Hundi Lantern Knock-Off

Remember my Home Goals 2011 post a few weeks back?  Well, this weekend, I knocked out one of the items of the list.  Well "ish".  My goal was to take down all of the contractor grade light fixtures and buy/make custom ones.  I have three that I really want out of my sight.  Forever.  The one that is really bugging me right now is the one in the breakfast nook.  With the new table and wainscotting looking so good, I chose that fixture to come down first.


Here are two inspiration pictures I have been drooling over for the breakfast nook.  I just think the black detail will really tie in to the black granite counter tops and be dainty enough to hang over the 48" round table.
After viewing The Hand Me Down House and getting some inspiration, I started a weekend project that saved me roughly $245.00!!!


I started off by buying this beautiful {read: well, there are no words} brass light fixture at a local thrift store for $9.99.  It was labeled $12.99, but by my asking at the register if she knew it worked, she got nervous, didn't answer and told me she "could do $9.99".  I said sure because I was going to buy it anyway.  Lesson learned:  keep your mouth shut and let people get nervous when responding to questions about products!
After disassembling the light, you can set aside the glass globe because you won't be needing that!  You will end up with the brass items below:
I feel like I owe you two additional pieces of information.  1.  what are the "non" brass items?  Answer: they are other items you will need to buy at Home Depot that I will list for you in a moment.  2.  Why is your fixture mount hanging from your tree?  Answer:  Because it was an awesome idea from Reginia at The NOT So Modern Family as a way to easily set it up for optimal spray paint coverage!

{Let's face it...you are basically witnessing the product of a Saturday DIY Date Night}

Now for spray painting.  I used what I had, which happened to be a can of high gloss black.  It honestly covered it like glass and looked beautifully (even if I did forget to wipe all of the dust off of it...oops).
Don't forget about the mounting piece hanging in your tree...spray that, too!  Even spray the cord black, just tape over the exposed copper wires.  (To keep any paint from going into the 4 light bulb holes, tuck some cotton balls in there and just remove them once the fixture is dry).

After letting everything dry for about 30 minutes, take them all in and place them on a towel on a flat working surface.  Now is a good time to talk about the additional products you will need.  You will need:
  • (3) S Hooks, size 2 1/8" (preferably closed, but you can man handle some open ones until they are closed)
  • (3) pieces of #16 chain cut in 1' pieces (this will already come in black)
  • (1) package of Coil Steel Hanger Strap, size 3/4" (this will be copper in color and will come in a package of 10')
  • Gorilla Glue
  • Black Ribbon that is wider than 3/4"
  • Hurricane Light
    • This is the most important piece.  You will want to take the "chandelier" piece with you from store to store.  Before you buy anything, you must make sure that there is a flute shape at the top and that you can set the chandelier completely through that smaller section.  I went to four stores before finally finding mine at Michael's.  It was $16.99, and I had a 40% off coupon I printed off of their website.  Google coupons!!!

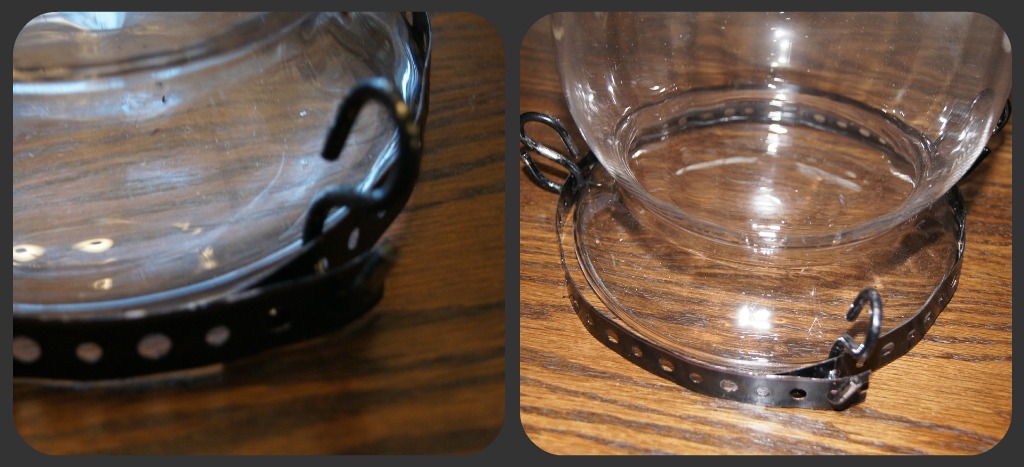
For assembly, you will need to cut the piece of hanger strap to an inch longer than the waist of the flute in the hurricane.  You will need to place it around the skinniest part of the flute and tighten it while marking where it overlaps.  Remove the strap from the hurricane and place on the table.  With Gorilla Glue, glue where the edges overlap and insert your 3 S hooks
.The next step is to slide the tension ring, with the S hooks already attached, to the top of the hurricane in the curve.  Here, you will want to measure (or count out how many circles are between each hook) to make sure that the hooks are the same distance apart.
Now - this process will more than likely cause some of your spray paint to scrape off.  Do not fret!  You can remove them and spray again OR just touch them up with some black paint and a brush (or a sharpie) that you probably already have in your craft drawer.


You will need to cover the hanger strap with some pretty ribbon.  I used some heavy, velvet ribbon that was 7/8".  For this, begin gluing where the seal in the hanger strap is.  Put dots of hot glue on the strap every inch or so and press the ribbon down.  When you get to an S hook, you will need to make a small cut exactly where the S hook is.  Then just continue gluing down until you make it to where you started.
You will also want to go ahead and connect the 3 chains.  You will leave the ends that you attach to the S hook CLOSED, but you will have to pry open the other end of the chain to attach towards the ceiling.


Now we are ready to go get the fixture mounting piece hanging from the tree and reassemble everything.
Now you may begin assembly:
*note that these picture make the paint job look shoddy.  This is just the way brass reacts to light or flash.  Trust me, these babies are midnight black!


You are ready to place the chandelier piece in the hurricane and stretch the 3 chains up to link onto the lip of the piece you flipped earlier.
I actually had to trim my chains a little because using the entire 1' that I had cut left my chandelier barely sitting in the hurricane.  I wanted it to sit a little deeper, so I just counted off the same amount on all three chains and adjusted accordingly.


Now you are ready to have your man wire it up.  Play around with it to get it balanced and flip the switch to see her beauty.  Here are some afters taken at about 9:00 p.m.  I will have to wait until I see my house in the daylight again (maybe Saturday) to take some better photos, but I promise to update.  Enjoy!

In about 2 hours and $25.00, I ended up with a great knock off!  You must check back this weekend for some much better after photos!


Don't you just love a great Pottery Barn Knock-Off!


*All photography compliments of Reginia at The NOT So Modern Family (except the nasty after shot!)


I am linked to Making The World Cuter, I Heart Nap Time, Skip To My Lou, Crafts Keep Me Sane, All Thingz Related, Giggles, Glitz and Glam, Seven Thirty Three, Thrifty Decor Chick, These Creative Juices, Funky Junk Interiors

09 January 2011

Getting the Pottery Barn look, Jan 2011

It's always a great day when you open the mailbox and see the newest Pottery Barn catalog.  I managed to keep it closed during dinner and until after I washed and dried my hair.  Then I sat down with my tape, scissors, pens, sharpies and post-its.  Yes, I studied this catalog.  I studied like a college freshman about to lose The Hope Scholarship.  It was my textbook.


I was determined to find some "themes" that will inspire me to write a new list of items to look for while thriftiquing, at Goodwill, at yard sales and at Home Goods.  I needed a focus, and I knew Pottery Barn would provide.


After studying "the good book", I have noticed a few things that PB thinks are hot.
1.  Put everything either UNDER or IN glass.
2.  Fill your vases with HUGE blooming BRANCHES.
3.  Collect TRAYS and put them EVERYWHERE.
4.  EVERYTHING needs a BASKET under it.
5.  DECORATE with NATURE or NATURAL things.
Even in the pictures I have posted so far, you can see where they use nature in their accessories:

  • Corks
  • Stones
  • Shells
  • Plants
  • Split Wood
  • Nests
  • Fruit/Veggies (popular right now are lemons, oranges, green apples and artichokes)
  • Nuts in the shell
  • Driftwood

Don't get the catalog?  Sign up for it here or flip through a virtual one here.


Which one of these Pottery Barn inspired themes match your style the most?  I'm thinking I can move around a few things that I already have and get the look today!

26 December 2010

Pottery Barn Jewelry Holder

Finally, I can write my post about an awesome Pottery Barn knock-off I created!  My friend just walked out the door with it as her 2010 Christmas gift.  I can only take credit for the grunt work not the inspiration.  I have been drooling over the real McCoy since I got the Christmas Pottery Barn catalogue (yes, I like to spell that word the British way...don't ask why...I've always been obsessed).  PB wanted $29-$49 dollars for this little invention:
I loved the idea for the earring hanger.  I think it would look so chic hanging in the bathroom.  Even a little vintage.  And the empty frames are so in right now.  I knew I could make it happen.


I bought some frames for $2.00 each at a local junk store.  Here are the ones I found:
My first step was to chose one and spray it.  I went with the square brown one.  My friend's bathroom is dark with brown and black accents, so I sprayed it black.  Next, I sanded it and distressed it for the Pottery Barn look I was going for.  This allowed the browns to show through.
The final step was to stretch the wire on the back of the frame to created a place to hang the earrings.  I used simple jewelry wire and thumbtacks.
I tried a few different ways, and after a little logical thinking and troubleshooting from the hubby, I ended up stretching the wire on the back of the frame as shown below:
Measure out where you want the wires and press the thumbtacks about 1/2 way in.
Tightly wrap the wire around one end and push the thumbtack firmly into the frame.
With gloves, tightly pull wire and wrap around opposite thumb tack.  Push deeply into frame.
Clip excess wire.
That's all it took, folks.  About $5.00 total for this project with plenty of paint, thumbtacks and wire to make about 20 more.  Here are some after pictures:
Instant art.  Functional.  Easy.
I'm excited because this project sparked an idea for an office project that I can't wait to get started when I find a large enough frame.


What DIY projects do you have brewing up?  Did you make any personal gifts to give this Christmas?


Linked up at To Sew With LoveThe Shabby NestToday's Creative BlogFunky Junk Interiors, Giggles, Glitz and Glam and Miss Mustard Seed.

21 December 2010

Vintage Splendor

Confession: I am in love.  Obsessed.  Smitten.


The victim, anything Mercury Glass.  I don't know what it is about it.  Maybe it is the confusing shade that blends silver and gold.  Or the nostalgic feel it gives me when looking at its tarnished finished.  It could be the way that it goes with any decor, both modern and traditional.  Or the way it casts a swampy glow on my walls.  Whatever it is, I hope it stays <3


The first time I saw Mercury Glass this season was in Kohl's.  I snagged these chunky candlesticks on sale for about $14.00 total.
The second item I found were these little votive candle holders.  I think they would go well as a centerpiece on a mirrored tray with the candlesticks for height.  I found these at Bed Bath and Beyond for 99 cents each!
Here is another picture that shows the "silvering" technique that is used to make mercury glass.
For Christmas, my mom gave me this beautiful hurricane lamp.  She left the label on the bottom, so I know it came from Michael's.  I am sure she got it for a steal of a deal!
It looks lovely on my mantle right now.


Yesterday, I found these vintage mercury glass ornaments in a little antique store on the Square.  They were still in the original box.  All 12 of them only ran me $6.99.  I will more than likely display these in a glass apothecary jar.  I also love how some of them are light blue, a great color that will add a pop to any neutral color palette.  
(Here is a link to a DIY project for making new ornaments look vintage.  To me, they are a quick way to give an ornament a faux mercury glass makeover for free!)

I popped into Pottery Barn Outlet today and got this little ornament for $1.97. It is their featured sale item of the week.


Just like words, once you learn a new one, you hear it everywhere you go.  Well, open any popular decor magazine, and you will find mercury glass.  I have found great items in Pottery Barn and West Elm.  Here are a few pictures of the beautiful mantelscapes and tablescapes you can create with this textured glass:
http://youvegottoseethis.myhomeideas.com
http://www.perfectlyimperfectblog.com/2010_11_01_archive.html
http://confessionsofaplateaddict.blogspot.com/2010/12/mercury-glass-sheet-music-and-burlapmy.html


Do you own anything mercury glass?  What about your obsessions this season?  What is it about something vintage that we all just fall in love with?


Related Posts Plugin for WordPress, Blogger...