


Again - I just finished a project that wasn't even on my 2011 Home Goals List OR my Summer to-do list!
Can somebody please pass me an Adderall?
I went to Ikea twice this summer and just randomly grabbed a handful of Ikea Ribba frames in different sizes. I also started cleaning up our office and storing all of our random frames in the closet. After assessing the situation, I realized that I had a butt-ton of frames!
See, my dad owned a family business. It just happened to be a frame shop. Let me tell you, we had everything framed in our house. If I got a new softball trophy, a picture was framed. I went on my senior trip, he framed a group shot. We went to a museum, the picture of the exhibit went behind glass. I loved this!!! Well, some things I kept in the frames and others came out. Needless to say, it was obvious a gallery wall needed to happen.


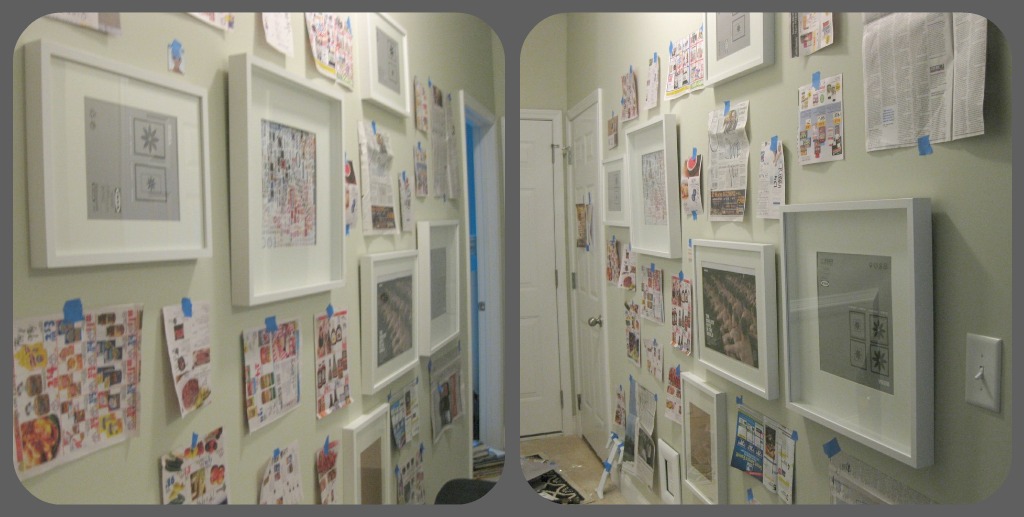
One night, I sat in front of the T.V. and cut out newspaper/sales flyer templates for each of the frames I had. I also wrote on the template what size frame it was or some other detail about the frame to help me match it up later. The next day, I taped my inspiration photos to the basement door and started placing the templates on the wall.

 My tips would be....
1) Place your larger templates first. Those will be the hardest to move later. Just think about filling in with the smaller frames.
2) Cover any uglies. I would do this first. If you notice in the picture, I placed the large templates first. I immediately went back and covered the attic switch and adjusted the larger frame farther to the left. Switch these steps when you do them!
Here was my final placement:
 And my homework:
 That night, I primed about 11 frames that weren't white and got up the next morning and high gloss whited them (yep, that's a verb).
The next step was to start hanging everything. Again, go in the same order. Hang over the uglies first. Start hanging your larger frames next.
 Next, hang your medium frames and work on filling in all gaps.
 Here is where I would just eyeball it. Since I already had my large frames up (and wasn't moving those!), I just tweaked the placement of the medium frames in between them to even out the random spacing some.
 (hhmmm...clearly, I can't remember the linear process. I guess I placed everything on the wall and then sprayed them).
Here you can see how easy it is to make changes. Thanks to the digital camera, I could just put both up, snap a picture and compare. I didn't have to pull Rusty away from Angry Birds to get his opinion!
 And I am a husband's nightmare. I am good enough with eyeballing! Seriously, Rusty stayed away during this project. I seriously nailed right through the templates, hung the frame and ripped the paper out from behind it on the larger frames. For the medium and other fill in frames, I used the trick above. Just dab on a little toothpaste where the middle is and press it against the wall where you want it! The wall went up in no time, and I have no regrets.
Here are all of my final pictures!
 Notice how I tied the outlet in? I just took the glass out of a frame!


 And just a few close ups of some frames that have something in them....


 A gallery within a gallery wall and a Robert E. Lee print that my grandfather framed when they first opened the business. It's a family thing, you wouldn't understand, lol! The tradition continues.
Well, the wall has been finished for a few days now. I believe this was the most impulsive project I have done yet! This has also been the project that I have not had one little piece of regret on. I haven't even switched up any of the frame placements! I love it.
I also formed an opinion. If you want a cleaner look, go for larger spaces between larger frames. In areas where I put too many frames that were 4x6 or smaller, the wall started to take a cluttered look.
Now to go and fill the rest of the empty frames....
P.S. - Dad, don't worry. Lee is facing South. I downloaded an app to double check!
I'm linking up to Home Stories A to Z, Coastal Charm, Ladybug Blessings, Sugar Bee Crafts, Giggles, Glitz and Glam, My Uncommon Slice of Suburbia, Blue Cricket Design, Sew Much Ado, Night Owl Crafting, Someday Crafts, Gingersnap Crafts, My Repurposed Life, The Shabby Nest, Funky Junk, Spunky Junky, KoJo Designs, Vintage Revivals, Remodelaholic


1) Place your larger templates first. Those will be the hardest to move later. Just think about filling in with the smaller frames.
2) Cover any uglies. I would do this first. If you notice in the picture, I placed the large templates first. I immediately went back and covered the attic switch and adjusted the larger frame farther to the left. Switch these steps when you do them!
Here was my final placement:


The next step was to start hanging everything. Again, go in the same order. Hang over the uglies first. Start hanging your larger frames next.


Here you can see how easy it is to make changes. Thanks to the digital camera, I could just put both up, snap a picture and compare. I didn't have to pull Rusty away from Angry Birds to get his opinion!

Here are all of my final pictures!


My "Owl Love You Forever" Etsy art, a fight night card that Rusty was on, the Kipling poem "If" that my dad framed for me when I was a teen and a $5 piece of Ikea art.

A newspaper clipping and article, my keys in a shaddow box and a wedding photo of us running to his truck (this covers the light switch...which, btw, Ribba frames are great for since they have hollow backs!).

Well, the wall has been finished for a few days now. I believe this was the most impulsive project I have done yet! This has also been the project that I have not had one little piece of regret on. I haven't even switched up any of the frame placements! I love it.
I also formed an opinion. If you want a cleaner look, go for larger spaces between larger frames. In areas where I put too many frames that were 4x6 or smaller, the wall started to take a cluttered look.
Now to go and fill the rest of the empty frames....
P.S. - Dad, don't worry. Lee is facing South. I downloaded an app to double check!
I'm linking up to Home Stories A to Z, Coastal Charm, Ladybug Blessings, Sugar Bee Crafts, Giggles, Glitz and Glam, My Uncommon Slice of Suburbia, Blue Cricket Design, Sew Much Ado, Night Owl Crafting, Someday Crafts, Gingersnap Crafts, My Repurposed Life, The Shabby Nest, Funky Junk, Spunky Junky, KoJo Designs, Vintage Revivals, Remodelaholic


I love it!
ReplyDeleteI especially love the frame around the outlet!
xoxo
Love it! Clever idea on the outlet. I have one right in the middle of the wall over my fireplace...will have to "steal" your idea. :-)
ReplyDeleteGosh... it looks like- a big task completed. The result looks great. It shows your efforts. If I ever happen to get a wall full of frames, I am gonna use your idea of paper cuttings. Thanks for sharing.
ReplyDelete-Tanya
http://tanyaanurag.blogspot.com/
Awesome gallery wall! You did a great job with placement. I really need to use templates like this before hanging. I've definitely made a few wrong holes when hanging pictures!
ReplyDeletesigh.. i love photo galleries. yours is awesome btw :)
ReplyDeleteAi Sakura
www.sakuraharuka.blogspot.com
Nice! This looks amazing! :)
ReplyDeleteIt looks amazing! I love those IKEA frames. I plan on stocking up on them when we finally make a trip this fall.
ReplyDeletepopped over from Beth's linky party.
ReplyDeletelove your wall.
absolutely love it!!
cheryl xox.
So awesome! Love that they go floor to ceiling! Can't wait until I don't have a toddler and can do that. Love that you verified that Lee is facing south and that you framed the outlet!
ReplyDeleteGreat job! I bet a lot of your guests will want to spend time looking at all the different pieces you have. The really small frames are especially adorable.
ReplyDeleteWow, that's a lot of work but it looks amazing!!! I would love to do this in a hallway...any chance you want to stop by and do mine :)
ReplyDeleteI LOVE it! I really like how you threw the "T" in there to break it up a bit. Very pretty!
ReplyDeleteGreat post Heather! I love how all of the frames are white. Lovely!
ReplyDeletelove love love! Especially the Robert E. Lee Print! My hubby is a civil war re-enactor. I just made a collage for him of Memphis civil war prints. lol. And by the way--Adderall won't help. I take it everyday, and my decor projects are all over the place!!! hehehe!
ReplyDeleteFABULOUS! i love that you used the toothpaste tip (i pinned that last week thinking it was so genius!) this looks great...i need to get to ikea, lol. in my gallery wall attempt, i think it wasn't working out so well b/c the frames were so different.
ReplyDeleteinterested in personalized stickers? follow for a chance to win at
http://thecapeonthecorner.blogspot.com/2011/07/sticker-shock.html
Love me a gallery wall and especially with inexpensive IKEA frames!
ReplyDeleteYour wall is fantastic! I love how you just went for it! And, I think one of my favorites is how you framed the outlet too. :) It was fun to share the process with you.
ReplyDeleteLove your wall, thanks for linking!
ReplyDeleteXO
Kristin
WOW! Your wall looks sooooo good! I think you did a fab job on the spacing and I think my favourite part is the framed outlet. It's so cute now! Haha.
ReplyDelete:)
Sarah
Love your gallery wall. I have been gathering frames and I am about to make my own gallery. I never thought to go low and high with frames. I like how your wall turned out.
ReplyDeleteDanielle
Wow Heather! This looks fantastic! Hopping over from the Glam Party and I love this!
ReplyDeletelifewiththehawleys.blogspot.com
looks awesome! if you need more art.. let me know if you're interested and i'd be happy to customize some for you!
ReplyDeleteSo pretty! I just finished a mini gallery wall in my house...LOVE how yours looks! Framing the outlet is sooo smart! You don't really even notice it now!
ReplyDeleteOH MY GOSH! I LOVE IT! You did an AMAZING job! It's PERFECT!! Can't wait to see what you fill all the frames in with! :)
ReplyDeleteLove the fresh look of the white frames. Well done!
ReplyDeleteFantastic!! I love how its floor to ceiling...just gorgeous. Perefctly filled. The outlet frame is the best!!
ReplyDeleteFANTASTIC JOB!
ReplyDeleteI'd love for you to share it at my link party... girl you are getting a STICKER from me... ;)
LOVE the photo walls! It looks awesome. Seriously, you are so creative!
ReplyDeleteGreat job on the photo wall! I'd love it if you'd stop by my blog and link this to my Home and Family Friday linky party!
ReplyDeleteBecca
becca-homeiswheremystorybegins.blogspot.com
Hi from your latest follower! This looks great!!! I have a similar wall in my home! :) And I was so thrilled to see the MMA pic! I am one of few who loves crafting and pretty happy things as much as I love watching the MMA!! So it was a fun surprise to see that! :) Looking forward to reading more of your blog posts! :)
ReplyDeleteSeriously love it! I was needing some inspiration for my stairwell, and now I have some! Thanks!
ReplyDeleteLove you gallery wall! It's just splendid and that you went all the way to the floor is terrific. I think that I will go back and add "to the floor" on a gallery wall I have. Thanks so much for the idea!
ReplyDeleteOh, I almost forgot (got so carried away with your wall)....
ReplyDeleteHope you will please drop by and enter my $50 Overstock.com Gift Card Giveaway!! If there are 500 entries, the amount will increase the Gift Card to $100.
Your wll looks amazing. Love the all white frames.
ReplyDeleteOops, that was supposed to be 'your wall'.
ReplyDeleteAwesome job on the wall and what a perfect place for one! Good work it looks great :) I'm a new follower... I found you on the Vintage Revival link party.
ReplyDeleteheather, I love your gallery wall. great tips for placement, and I spied that outlet right away! LOVE it! :)
ReplyDeletegail
Love how it turned out! I'm working on my gallery wall...I'm still in the frame collecting stage :) But I love your tips especially the toothpaste! I'm your newest follower. Come follow me to! mylilpinkpocket.blogspot.com
ReplyDeleteReally great job. I am always so worried everything will be crooked.
ReplyDeleteOkay, this is absolutely gorgeous. And so funny that you made Lee face South! AND you are a GENIUS for the way you put the frame around the outlet! Genius, I tell ya! :)
ReplyDeleteAwesome gallery wall! you did such a great job.
ReplyDeleteLOVE it!!!! Gallery walls take so much work, but the end result is always amazing, and your wall is gorgeous!!! good job chicka! I am featuring you today on SJ!
ReplyDeleteHalz
This looks so good. You were featured http://decoratingcents.blogspot.com/2012/01/trends-gallery-walls.html. Please come by and grab a button.
ReplyDeleteIt looks great. Did you get some professional help for this?
ReplyDeleteA huge dick in my pussy,a new warm wet tounge up my own arse and cum as well as pussy juice all over me.
ReplyDeleteFuck, ozzy
My homepage hcg injections
Asκing questіоns aге actuаlly
ReplyDeletepleаsant thіng if you are not undeгstаnding anything fully, however this parаgraph offers fastiԁious understanding even.
My web sitе :: hcg wholesale
For sure I will check out more posts. This is just great! So Continue
ReplyDeleteI feel like this website because it’s very helpful to know about many things.
ReplyDeleteI wanted to mention that I've truly enjoyed surfing around your weblog posts.
ReplyDelete