


Here are two inspiration pictures I have been drooling over for the breakfast nook. I just think the black detail will really tie in to the black granite counter tops and be dainty enough to hang over the 48" round table.

I started off by buying this beautiful {read: well, there are no words} brass light fixture at a local thrift store for $9.99. It was labeled $12.99, but by my asking at the register if she knew it worked, she got nervous, didn't answer and told me she "could do $9.99". I said sure because I was going to buy it anyway. Lesson learned: keep your mouth shut and let people get nervous when responding to questions about products!

After disassembling the light, you can set aside the glass globe because you won't be needing that! You will end up with the brass items below:

I feel like I owe you two additional pieces of information. 1. what are the "non" brass items? Answer: they are other items you will need to buy at Home Depot that I will list for you in a moment. 2. Why is your fixture mount hanging from your tree? Answer: Because it was an awesome idea from Reginia at The NOT So Modern Family as a way to easily set it up for optimal spray paint coverage!
{Let's face it...you are basically witnessing the product of a Saturday DIY Date Night}
Now for spray painting. I used what I had, which happened to be a can of high gloss black. It honestly covered it like glass and looked beautifully (even if I did forget to wipe all of the dust off of it...oops).

Don't forget about the mounting piece hanging in your tree...spray that, too! Even spray the cord black, just tape over the exposed copper wires. (To keep any paint from going into the 4 light bulb holes, tuck some cotton balls in there and just remove them once the fixture is dry).
After letting everything dry for about 30 minutes, take them all in and place them on a towel on a flat working surface. Now is a good time to talk about the additional products you will need. You will need:
- (3) S Hooks, size 2 1/8" (preferably closed, but you can man handle some open ones until they are closed)
- (3) pieces of #16 chain cut in 1' pieces (this will already come in black)
- (1) package of Coil Steel Hanger Strap, size 3/4" (this will be copper in color and will come in a package of 10')
- Gorilla Glue
- Black Ribbon that is wider than 3/4"
- Hurricane Light
- This is the most important piece. You will want to take the "chandelier" piece with you from store to store. Before you buy anything, you must make sure that there is a flute shape at the top and that you can set the chandelier completely through that smaller section. I went to four stores before finally finding mine at Michael's. It was $16.99, and I had a 40% off coupon I printed off of their website. Google coupons!!!

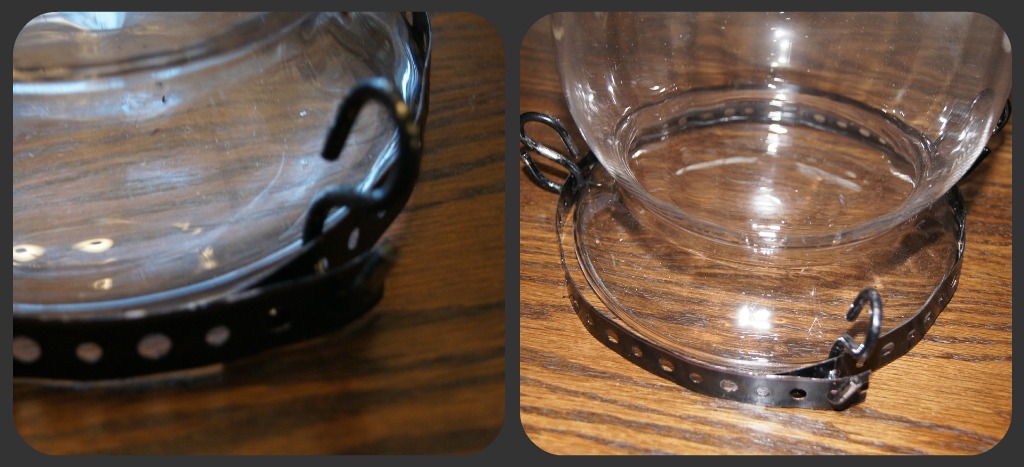

You will need to cover the hanger strap with some pretty ribbon. I used some heavy, velvet ribbon that was 7/8". For this, begin gluing where the seal in the hanger strap is. Put dots of hot glue on the strap every inch or so and press the ribbon down. When you get to an S hook, you will need to make a small cut exactly where the S hook is. Then just continue gluing down until you make it to where you started.

Now we are ready to go get the fixture mounting piece hanging from the tree and reassemble everything.


You are ready to place the chandelier piece in the hurricane and stretch the 3 chains up to link onto the lip of the piece you flipped earlier.

Now you are ready to have your man wire it up. Play around with it to get it balanced and flip the switch to see her beauty. Here are some afters taken at about 9:00 p.m. I will have to wait until I see my house in the daylight again (maybe Saturday) to take some better photos, but I promise to update. Enjoy!


Don't you just love a great Pottery Barn Knock-Off!
*All photography compliments of Reginia at The NOT So Modern Family (except the nasty after shot!)
I am linked to Making The World Cuter, I Heart Nap Time, Skip To My Lou, Crafts Keep Me Sane, All Thingz Related, Giggles, Glitz and Glam, Seven Thirty Three, Thrifty Decor Chick, These Creative Juices, Funky Junk Interiors


Final Product = Fabulous!!!
ReplyDeleteMoney saved is one of the best parts!!
R may just make it as an electrician after all haha
Props to your photopgrapher for the good "in progress pics" noticed you left the pics of yourself out :)
Alreay looking forward to Fridays DIY Date! :)
The Pottery Barn Hundi Lantern knock-off is a fantastic budget-friendly alternative that still delivers style and charm. I appreciate how DIY enthusiasts share creative ways to achieve the same look at lower costs. For those balancing studies and projects, NURS FPX 4010 Assessment 4 is another great resource for saving time effectively.
DeleteWoot! To the woo!!!!!!! You know I am crazy for a PB knock off. :) Great job my dear. I thin it is lovely!!! You should be so proud. I know I am --- JUST FOR KNOWING YOU. :) Have a great one my dear.
ReplyDeleteCheers~
e
awesome!!!
ReplyDeleteHoly amazing makeover!!
ReplyDeleteWow, what a great transformation! Inspiration is a wonderful thing when it hits you!
ReplyDeleteThat looks amazing! Don't you just love when you get just what you want for so much less?
ReplyDeleteWow. That's awesome! I love it. I want one. :)
ReplyDeleteStopping by from I Heart Naptime. This is AWESOME! Very creative! Thanks for sharing.
ReplyDeleteJen
Scissors & Spatulas
What a great knock-off! I love me some Pottery Barn!
ReplyDeleteStopping by from MTWCM and saw your post. WOW! beautiful. Absolutely love what you did!
ReplyDeleteWow this is awesome!! I'd love for you to share at my weekend linky party starting Friday :)
ReplyDeleteThat is awesome! I can't believe you did that - very very clever!
ReplyDeleteNo Frickin Way!!!
ReplyDeleteI can't believe you pulled this off. It looks fantastic.
A friday's favorite for sure :-)
Wow! I am so impressed! It looks really wonderful!
ReplyDeleteI am your newest follower. I too am gearing up to make my own ugly brass foyer chandelier into this stunning, modern fixture. Thanks for the great tutorial.
ReplyDeleteVisit me at http://designingdreams-sheri.blogspot.com
That's amazing! I've been lusting after that fixture myself for quite a while. Clearly I'm going to need to start haunting the Goodwill lamp section now...
ReplyDeleteI'm stopping by from TDC Before and After Party and this looks amazing!! Something I may definitely have to try in my own home... Good work!
ReplyDeleteOH my Gosh this is amazing to! Well done!! I am now your new follower. I would looooove for you to swing by my blog and follow me as well. Also, you should take gander at the post I have up about chandelier redo and check the other PB very similar to this. Awesome you guys have design ESP lol.
ReplyDeletetake care hun.
Deb
http://dejarenew.blogspot.com
fantastic! I adore that light fixture
ReplyDeletewow!!! I have been wondering what could be done with all those fixtures I keep seeing at my local re-store. I knew there had to be something they could be used for. Now I know. I am going to tackle this for sure~!!!! Thank you so much for posting!
ReplyDeleteWOW! I LOVE IT! I wanna do this!!! New follower :)
ReplyDeleteThis looks so awesome! I can't believe how crafty/creative you are (well, I can, but geesh)!
ReplyDeleteFABULOUS! That is thinking outside the box or in this case the light fixture. Great job.
ReplyDeleteWhat a great job!!! I too have been looking at that Pottery Barn light...thanks for giving me an idea...
ReplyDeleteHoly Cow!!!! I can't believe you achieved such a great look out of that fixture. I'd love to try something like that except in the last year, we have replaced nearly every light fixture in our house. I don't know if my husband would like replacing a new fixture. But I'm so gonna bookmark this idea for the future.
ReplyDeleteVery impressive!
ReplyDeleteYou did a great job. If the glass part stayed together you could make a terrarium out of it =)
ReplyDeleteWonderful knock off! I'm going to bookmark this for a future project :-)
ReplyDeletewhat a wonderful idea looks great
ReplyDeleteBRILLIANT!
ReplyDeleteI love this and want to make one, however I'm a bit concerned about the glass. I'm wondering if it somehow fell off if it would shatter. I have 4 young kids and occasionally find one of them on the dining room table pushing the chandelier like it is a child on a swing set lol. I do worry about millions of shards of glass shattering everywhere.
ReplyDeleteamazing project. I cannot believe you made that!!!
ReplyDeleteKeep 'em coming
Wow. Amazing transformation. Inspiring for thrifty folks everywhere.
ReplyDeleteWow!!! What a transformation...great idea!!!
ReplyDeleteAre you serious?!? I never, NEVER, would've seen where that thrift store lamp could go! How cool is that!
ReplyDeleteCrap . . . now I gotta go back to the thrift store AGAIN today and look at things in a whole new light. Thanks a lot ;)
Droppin' by from FB CrafterMinds group.
Wow! Awesome job! Thanks for the inspiration!
ReplyDeleteThis is a great knock-off. Thank you for sharing!
ReplyDeleteTHAT.IS.AWESOME!!!!!!!!!!!!!!!
ReplyDeleteWow love this! Have to try it!
ReplyDeleteThanks for sharing!
K:)
Looks awesome! :) I saw you on Remodelaholic this morning -- way to go! :) Have an awesome weekend!!
ReplyDeleteVery nice!
ReplyDeleteNice post. I was checking continuously this blog
ReplyDeleteand I am impressed! Extremely helpful information specially the last part :) I
care for such information much. I was seeking this particular information for a very long time.
Thank you and best of luck.
Also see my page: best registry cleaner for windows 7
First time here! Nice job!
ReplyDeleteFirst time here! Nice job!
ReplyDeleteWow! This is really awesome!
ReplyDeleteDeb
Seekin Lavender Lane
ReplyDeletewow just what I was looking for
I’m really glad I have found this information.
ReplyDeleteI am really enjoying reading your well written articles.
ReplyDeleteNice site you got here, very awesome and good content.
ReplyDeleteThanks For Sharing Such An Excellent Post Enjoyed Reading it.
ReplyDeleteGreat job for publishing such a beneficial web site.
ReplyDeleteHello, I’m happy to see some great articles on your site.
ReplyDeleteImpressive!Thanks for giving me an idea to my site.
ReplyDeleteIt was definitely informative. Your website is very helpful.
ReplyDeleteExcellent and nice post. It will beneficial for everyone.
ReplyDeleteThanks for posting this educative writeup. I really like your means of blogging.
ReplyDeleteThank you for the good story. Considered a great and very useful content.
ReplyDeleteWow, superb blog layout! Magnificent, let alone the content fantastic.
ReplyDeleteCool
ReplyDelete