31 January 2011

Pottery Barn Hundi Lantern Knock-Off

Remember my Home Goals 2011 post a few weeks back?  Well, this weekend, I knocked out one of the items of the list.  Well "ish".  My goal was to take down all of the contractor grade light fixtures and buy/make custom ones.  I have three that I really want out of my sight.  Forever.  The one that is really bugging me right now is the one in the breakfast nook.  With the new table and wainscotting looking so good, I chose that fixture to come down first.


Here are two inspiration pictures I have been drooling over for the breakfast nook.  I just think the black detail will really tie in to the black granite counter tops and be dainty enough to hang over the 48" round table.
After viewing The Hand Me Down House and getting some inspiration, I started a weekend project that saved me roughly $245.00!!!


I started off by buying this beautiful {read: well, there are no words} brass light fixture at a local thrift store for $9.99.  It was labeled $12.99, but by my asking at the register if she knew it worked, she got nervous, didn't answer and told me she "could do $9.99".  I said sure because I was going to buy it anyway.  Lesson learned:  keep your mouth shut and let people get nervous when responding to questions about products!
After disassembling the light, you can set aside the glass globe because you won't be needing that!  You will end up with the brass items below:
I feel like I owe you two additional pieces of information.  1.  what are the "non" brass items?  Answer: they are other items you will need to buy at Home Depot that I will list for you in a moment.  2.  Why is your fixture mount hanging from your tree?  Answer:  Because it was an awesome idea from Reginia at The NOT So Modern Family as a way to easily set it up for optimal spray paint coverage!

{Let's face it...you are basically witnessing the product of a Saturday DIY Date Night}

Now for spray painting.  I used what I had, which happened to be a can of high gloss black.  It honestly covered it like glass and looked beautifully (even if I did forget to wipe all of the dust off of it...oops).
Don't forget about the mounting piece hanging in your tree...spray that, too!  Even spray the cord black, just tape over the exposed copper wires.  (To keep any paint from going into the 4 light bulb holes, tuck some cotton balls in there and just remove them once the fixture is dry).

After letting everything dry for about 30 minutes, take them all in and place them on a towel on a flat working surface.  Now is a good time to talk about the additional products you will need.  You will need:
  • (3) S Hooks, size 2 1/8" (preferably closed, but you can man handle some open ones until they are closed)
  • (3) pieces of #16 chain cut in 1' pieces (this will already come in black)
  • (1) package of Coil Steel Hanger Strap, size 3/4" (this will be copper in color and will come in a package of 10')
  • Gorilla Glue
  • Black Ribbon that is wider than 3/4"
  • Hurricane Light
    • This is the most important piece.  You will want to take the "chandelier" piece with you from store to store.  Before you buy anything, you must make sure that there is a flute shape at the top and that you can set the chandelier completely through that smaller section.  I went to four stores before finally finding mine at Michael's.  It was $16.99, and I had a 40% off coupon I printed off of their website.  Google coupons!!!

For assembly, you will need to cut the piece of hanger strap to an inch longer than the waist of the flute in the hurricane.  You will need to place it around the skinniest part of the flute and tighten it while marking where it overlaps.  Remove the strap from the hurricane and place on the table.  With Gorilla Glue, glue where the edges overlap and insert your 3 S hooks
.The next step is to slide the tension ring, with the S hooks already attached, to the top of the hurricane in the curve.  Here, you will want to measure (or count out how many circles are between each hook) to make sure that the hooks are the same distance apart.
Now - this process will more than likely cause some of your spray paint to scrape off.  Do not fret!  You can remove them and spray again OR just touch them up with some black paint and a brush (or a sharpie) that you probably already have in your craft drawer.


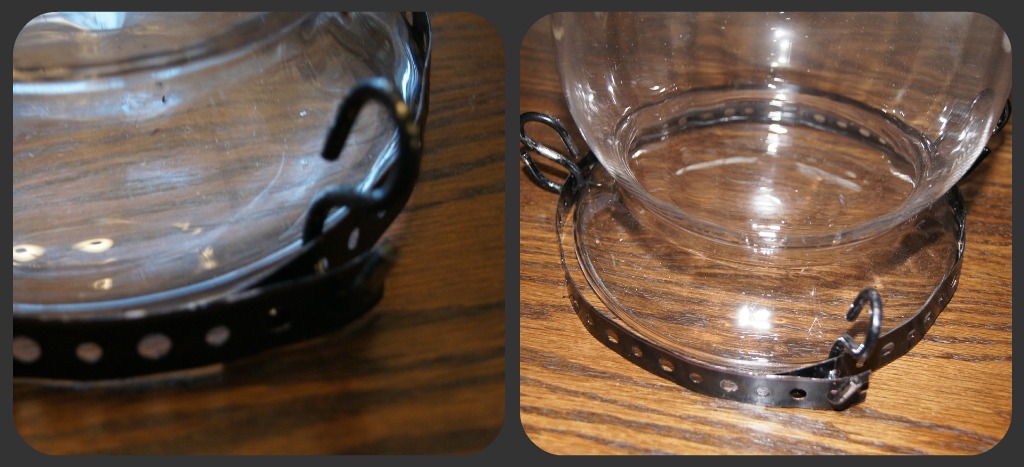
You will need to cover the hanger strap with some pretty ribbon.  I used some heavy, velvet ribbon that was 7/8".  For this, begin gluing where the seal in the hanger strap is.  Put dots of hot glue on the strap every inch or so and press the ribbon down.  When you get to an S hook, you will need to make a small cut exactly where the S hook is.  Then just continue gluing down until you make it to where you started.
You will also want to go ahead and connect the 3 chains.  You will leave the ends that you attach to the S hook CLOSED, but you will have to pry open the other end of the chain to attach towards the ceiling.


Now we are ready to go get the fixture mounting piece hanging from the tree and reassemble everything.
Now you may begin assembly:
*note that these picture make the paint job look shoddy.  This is just the way brass reacts to light or flash.  Trust me, these babies are midnight black!


You are ready to place the chandelier piece in the hurricane and stretch the 3 chains up to link onto the lip of the piece you flipped earlier.
I actually had to trim my chains a little because using the entire 1' that I had cut left my chandelier barely sitting in the hurricane.  I wanted it to sit a little deeper, so I just counted off the same amount on all three chains and adjusted accordingly.


Now you are ready to have your man wire it up.  Play around with it to get it balanced and flip the switch to see her beauty.  Here are some afters taken at about 9:00 p.m.  I will have to wait until I see my house in the daylight again (maybe Saturday) to take some better photos, but I promise to update.  Enjoy!

In about 2 hours and $25.00, I ended up with a great knock off!  You must check back this weekend for some much better after photos!


Don't you just love a great Pottery Barn Knock-Off!


*All photography compliments of Reginia at The NOT So Modern Family (except the nasty after shot!)


I am linked to Making The World Cuter, I Heart Nap Time, Skip To My Lou, Crafts Keep Me Sane, All Thingz Related, Giggles, Glitz and Glam, Seven Thirty Three, Thrifty Decor Chick, These Creative Juices, Funky Junk Interiors

27 January 2011

The Evolution of a Blog

The evolution of a blog:
  • I am so addicted to reading these things called "blogs".  I feel like a stalker.
  • I would love to blog, but I have no idea what to name it.
  • Well, I could just name it something to get started and change it later if I find a better one.  What else am I going to do during all of this time my husband watches football?
  • I will just blog to keep family and friends posted on things Rusty and I are doing around the house.
  • Awe, that's cute.  Some of my friends are following.
  • Maybe I should upload my posts to Facebook.
  • Man, someone in Australia read my blog today.
  • I'll just take some pictures of the steps to this project.
  • Hhhmm... need an "About Us" page, a "Dogs" page, a "Our Home" page and a "Projects" page.
  • I just got my first comment from a stranger.  How did they find me?
  • I want more strangers.
  • Linky Party.
  • What project can I do today that would make a good blog post.
  • Oh no, I totally forgot to take a picture of that step.
  • I feel so bad; it has been 3 days since I posted.
  • Everyone's blog looks better than mine!  I want to be better!
This may just be the evolution of my blog, but I am at the stage of wanting to improve.  Improve what?  Posts.  Layout.  Design.  Convenience.  Pictures.  Writing.  Everything.

When I came across the Blog Hop Party over at Beauty in the Attempt, I knew I had to participate.  It is called "The Bold and the Beautiful - Your Blog Reviewed".  The object is to link your blog to other blogs and "throw-down" like it's 1999 with lots of feedback for each other.  Here is how you participate (directly copied and pasted):
While visiting my blog, and other blogs over at Beauty in the Attempt, check out the layout, pages, buttons, sidebar and gadgets. I would love for you to gently critique my blog. I’m hoping you will leave me some positive feedback about my blog. It would be great if you could give me constructive criticism but be sure to tell me what you like about my blog too! Do you like my pictures? Does my blog load quickly for you? How about the font? All tips and tidbits welcome! 
You are welcome to join the party, it starts Thursday night and is open for a week. 

Thanks,
Heather

25 January 2011

Winter Wreath

Just like I had to freshen up my mantle after Christmas, my door got a little freshening up as well.  Since December 31st, I have been staring at a plain front door.  I am sure that Rusty loves it since it keep any hopes of social interaction to a bare minimum, I need a more cheerful greeting for when I return home from work.  {Who I am kidding.  I am extremely competitive, and all of my neighbors have something cute on their door.}
Thankfully, I knew in advance that I would be locked up for a few days with our Winter Storm 2011 (sounds scary, doesn't it).  On my way up the mountain last Sunday, I stopped by Michael's and looks around for some ideas for my wreaths.  The only thing I knew about this wreath, was that I was planning on using an old picture frame as the base after inspiration from my cousin over at LPC.
After about 45 minutes of browsing, I came home with a little bag of goodies.  I wanted to be safe because I didn't know what I wanted, and I knew I might not be able to leave the house again for days.  It gave me something to do between loads of clothes, stirring the chili and naps.  No rush, either.  They canceled school in our district for an entire week! (happy dance)


After spraying the frame with primer, I sat down at the table and started placing everything on the frame until I saw something I liked.  


Then I had to select my colors.  I wanted something that would pop against the black and whites of winter.
Finally, I decided on a layout with the middle blue and plum color.  The rest was the easy part.  I just painted, scuffed and glued.
I looped a ribbon to make a hanger.
I glued a few feathers to keep with my current obsession.
I added a wire at the bottom to perch some birds on.
I painted some cheap-o wooden birds from Michaels and drew/Sharpied on some details.
Put two together and make them love birds (can you tell which is the girly bird?)
I tucked a little "T" in there to rep the family name.
After finished, I ended up with this:
Excuse the bad photo.  I never even see my house in the daylight to take a good pic.
I am not sure how much I love it, but it only cost about 3 dollars and kept me busy for about an hour.  I'm not saying it's going to win any neighborhood contests, but  I love the concept and may try to play around with another frame for a wreath.


Are you competitive with your neighbors? Or maybe they're competitive with you!

24 January 2011

My Top 3 - Thrifty Decor Chick's Feature

Hello!  It is such an honor to be on Thrifty Decor Chick's blog.  Here is a little bit about ME:  I am in my "twenties" and am often mistaken for being in my teens.  I am a teacher and my boss can barely pick me out from the students when she walks in!  I am in love...with one hunk of a man, two basset hounds, my new house, crafting, DIYing, "thriftiquing", reading and blogging!  Who would have known that by googling the words "Ancient Marble Sherwin Williams" back in November trying to find other colors for my home, I would stumble into the world of blogging.  Like everything else I do, I let it consume me and started an addiction.  Within a few weeks, I birthed {twenty}something.


It was EASY to figure out which posts left my other posts in the dirt after running a quick stat report.  Here they are in no particular order:


Back in December, I did a post on how to Make The Daily More Beautiful.  Here, I showed how to instantly glam up your soap dispenser with items you, more than likely, already have.
Right after Christmas, I revealed my personal rendition of a Pottery Barn Jewelry Holder that I made for a gift for my good friend.  This post, by far, is the most popular "How To" read I have.
I consider this last post a DIY tutorial since I walked you through creating a post-Christmas, winter mantlescape.
I would love for you to hop on over to my blog and say hello.  Check out some other things I have done and leave a comment or two!  It was so nice to meet you :)

Thriftiquing 1-23-11

thrif.tiqu.ing


[thrif-teek-ing]
verb


-verb
1.  the finding of antique/vintage items but for reasonable prices at thrift stores and such.
2. a way to burn hours upon hours and effectively avoid housework
3. a friendly competition requiring quick optic reflexes
4. a form of shopping that will lead to vocal outbursts of prices and analysis of deals that will have people coming over to see what is wrong making you paranoid that they are attempting to snatch up your find before you do

Origin:
2010; Reginia @ The Not So Modern Family


For about two hours today, Reginia and I spent some time in the local antique stores on Dahlonega's square.  We had NOTHING in mind that we wanted but knew these stores had plenty that we needed!  Here are some pictures of what I came home with.
When I saw these vintage tin canisters, I wandered up to them to look at the price.  Upon discovering that they were only $6.00, I yelled the price out loud {to myself} and snatched them up as about 3 different people came around the corner.  Thanks to Regina's Blackberry, we found these same items on Etsy for about $10.00 each {not including shipping}.  Deal!
I have been eyeballing some wire baskets to try to bring a little texture and industrialism to my decor.  What I loved about this one was the unique rectangular shape.  I am thinking it would look awesome on my rectangular dining room table with some mason jars of flowers spilling out.
I grabbed this vintage, real wood oval frame for $5.00.  I am thinking I will paint it and distress it to hang on a wall or prop up on a mantle as an empty frame.

This last picture will really help you understand the true nature of Thriftiquing.  Just like I shouted about the canisters, I crawled onto the floor when I saw this 18-drawer mini apothecary piece.
Did you think I was kidding!  It was an emotional reaction.  I brought it home and am playing around with all of the places I could put it and all of the things I can keep in it.  The office for pens, pencils, stamps.  The bathroom for make-up brushes, Q-Tips, razors.  My closet for earrings, bracelets, necklaces.  The kitchen for ......?

Antiquing is in my blood!  I grew up working in my grandmother's, E.I.'s, booth.  I furnished my own bedroom with antique furniture that she would put on her own personal lay-away program.  Now, I have carried it on as it has morphed into Thriftiquing.

What about you?  Can you tolerate going through aisles and aisles of booths waiting for something to talk to you, or would you rather just flip open the Pottery Barn catalog for a reproduction?

23 January 2011

Breakfast Nook Redo - During

This weekend, my dad delivered my free Craiglist table to add to my breakfast nook redo.  I was so excited to see if the ideas from some of my inspiration tables would work.  Rusty and I set it up in the breakfast nook to check on size.  It is a 48" table, and we needed to still be able to open a pantry and back door in the nook.
The size is PERFECT!  However, there is one small problem.  {And I say small because how big could a problem be when the goods are FREE?}  The only problem is that the table top itself is not wood.  In order for us to be able to stain it to match the chairs we already have, we need to be able to strip it.  Here are some close up pictures of each of the pieces for you to see.
Wood pedestal
Salvageable wooden trim 
Wood veneer top
Here is our inspiration photo.  We already have the four walnut stained chairs.  We will need to paint the pedestal and trim white and stain the table top.
How will we press on?  We called up our friends at Black Mountain Furniture {who also made our custom office built-ins} to build us a table top.  They are able to cut it to size and leave it natural for us to stain to match our chairs!


I am still working on getting that room painted, hanging some curtains, getting a drum shade and putting some plates on the wall.  We are very much in the "during" stage.


What's the best free item you ever scored?

18 January 2011

Don't Judge!

Perfect timing!  I was feeling guilty for getting home from vacation almost 3 days ago and still living out of my suitcase AND for being off for almost 27 days out of the last 31 (Christmas Break and Snow Day Week) and still having parts of my house in an embarrassing mess...UNTIL...I found lots of  long, lost sisters in the same boat over at Decor Chick's Linky Party.


{Mom, turn your head}


Dirty Little Secret #1:  The Office
What had happened was...Even though I have these great built-ins for storage, Rusty and I spent a day filling them and organizing them with the contents of the closet and making all of those piles to file, box up, go through, etc.  They are still sitting there.
Dirty Little Secret #2:  The Laundry Room
No wonder I have used my garden tub as a dirty clothes basket and found 9 dryer sheets in the pile of clothes below.
Such a Slacker!
Who wants to do laundry in such an unorganized laundry room!?  Thankfully, I am 1/2 through with a little laundry room makeover that I can't wait to finish and share.


{Warning: Only the strong of heart should proceed.  Even then, say a quick prayer}


Here's the deal.  My final space is not IN my house.  It is an extension of my home.  I spend more time with it than I do my home, so I'm counting it.  If you know me, you know this is my nemesis, a formidable and usually victorious opponent...


Dirty Little Secret (Read as: Obvious Problem) #3:  The Cavalier (this time...it has also been The Buick, The Escort and The Monte Carlo)
No matter what, I only keep it clean for about 2 weeks.  I literally get in and throw stuff into the back seat.  Things go there to die.  On a positive note, I can probably outfit myself for about a week without coming home.  Let's just say, I don't have a Mary Poppins' bag; I have a Mary Poppins' car.


Am I stressed?  Nope.  I still fill my time up with things more important.  For instance, last night I left the dishes in the sink, threw the cushions off of the couch and cuddled up under my favorite E.I. quilt with the hubs for a 2 1/2 hour movie!  Tonight?  Well, it's Biggest Loser and a bowl of ice cream.


In all seriousness, Decor Chick's Linky Party is a big eye opener.  For all of us. We must remind ourselves that on the blogs we stalk, those beautiful pictures are very well thought out and possibly even Photoshoped.  Tip the camera down or around a few degrees, we are likely to see the actual photos we are all posting.  Some are extreme cases that give us a few laughs, but most are just the daily lived in look that proves how rich our lives are with activities, friends and loved ones who distract us from being too consumed with perfection.


What's your dirty little (clean) secret?!


17 January 2011

Handcrafted Birdies

While stuck inside during Snowpocalypse 2011, I ran across the cutest little handmade birdies on the blog Living Life Creatively.  They were to die for!


{like I need to add any more birds to my decor}


I flew (too cheesy) hurried over to her Etsy shop and quickly bought the pattern for $3.00!  In less than 2 hours, I had made a practice fabric and paper one - minus the little legs.  I plan on adding the legs once I get to the store, but they are cute without them as well!


Here are some pictures to show you how easy this project is.


{fabric bird}


The pattern at this size works best with the fabric birds,
but I might enlarge it to make my next paper one. 
Just practicing, I traced it out on a piece
of left over fabric from this project.
Sewing.
Stitching.
Leaving some portion open for stuffing.
I stuffed this bird with pulled apart cotton balls since
I didn't have any filling.  Using a pencil or scissors
really helps getting into the tail and beak.
{paper bird}
What am I going to do with these?  I think the possibilities are endless.  Use them as place cards.  Put them on wreaths.  Use as gift tags.  String for garland.  Make tree ornaments.   Use as potted plant ornaments or labels.  Fill with oils or potpourri to make drawers smell good.  Use as a pin cushion.  Hang them from a hand made baby mobile.  Sprinkle them with love around the house!


Look around your house.  Do you see any themes that you use in decorating?  I'm guilty as charged!  I can't keep my hands off the birdies...
Related Posts Plugin for WordPress, Blogger...